193 lines
12 KiB
Markdown
193 lines
12 KiB
Markdown
# CMS-Customer-setup-flow-with-NSACM_688983312
|
||
## Prerequisite for New SaaS fram
|
||
|
||
### Step 1: Configure CMS Multi-tenancy
|
||
|
||
1. **Enable CMS multi-tenant mode in a new SaaS farm**
|
||
By default CMS multi-tenant mode is **disabled**. This is a one-time job, when a new SaaS farm is set up, perform the following steps to enable CMS multi-tenant mode, if the SaaS farm has enabled CMS MT before, skip it.
|
||
- Open the UCMDB Server JMX Console of the Provider Customer, and search for **enableTenant**.
|
||
- In the enableTenant section, enter the value ‘ **All Tenants** ’ for tenantName. This is the name of the default UCMDB tenant of the first customer.
|
||
- Click Invoke.
|
||
- Restart the UCMDB server pod by the command:
|
||
```
|
||
kubectl rollout restart sts itom-ucmdb -n <namespace></namespace>
|
||
```
|
||
- After the UCMDB default tenant is created, the multi-tenancy mode is enabled and all available UCMDB customers will have the default tenant ‘ **All Tenants** ’ created.
|
||
2. **Disable SaaS CMS ‘Owner tenant’**
|
||
Follow these steps to disable CI owner tenant so that owner tenant and consumer tenants won't mix up.
|
||
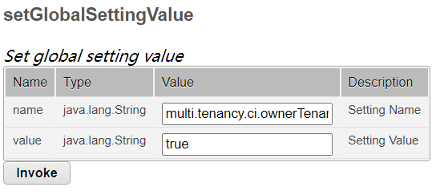
- Open the UCMDB Server JMX Console of the Provider Customer, and search for **setGlobalSettingValue**.
|
||
- Enter **[multi.tenancy.ci](http://multi.tenancy.ci/).ownerTenant.disabled** for name and set value to true.
|
||
- Click **Invoke**
|
||
|
||
|
||
## Scenario 1 - Brand new CMS customer
|
||
|
||
### Step 1: Provison a CMS customer via X4X (all tasks are automated)
|
||
|
||
Auto creates a new CMS customer with the same tenantID as the SMAX tenant via X4X, including:
|
||
|
||
- Create a customer via JMX
|
||
- Bind customer to IdM Org and create an admin group with SuperAdmin\[CMDB\] role, and bind tenant admin user to this group
|
||
- Allocate license
|
||
- NSACM needed post tasks:
|
||
- Set specific Identification rules as 'No Identification' for BusinessApplication, BusinessService, and InfrastructureService
|
||
- Add unknown in OsFamily
|
||
- Enable enhanced CI lifecycle
|
||
- **Configure metaphase default value as 'Inherited from the parent node' for node elements (Cpu, DiskDevice, FileSystem, and Interface in UCMDB**
|
||
- Enable NSACM
|
||
|
||
### Step 2: Configure Remote CMS
|
||
|
||
See details: [Config Remote CMS](https://docs.microfocus.com/doc/SMAX/24.3/SsoUcmdb).
|
||
|
||
### Step 3: Enable enrichment rules in UCMDB (no need after 23.4)
|
||
|
||
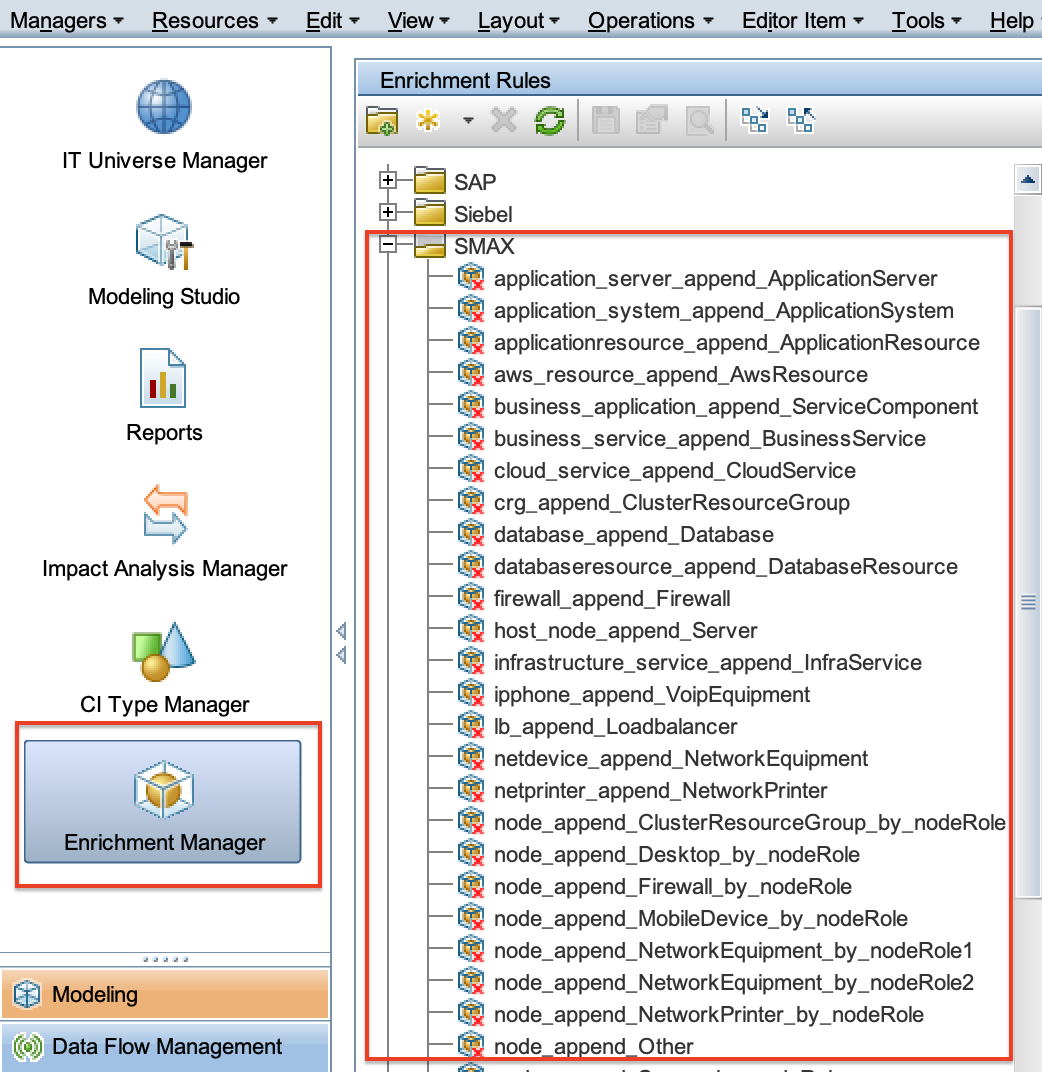
When a CI of a federated CI type is created or discovered in UCMDB, enrichment rules are implemented for mapping Subtypes of SMA. The SMAX folder contains preset enrichment rules for the federated CI types. By default, these enrichment rules are inactive, we recommend that you activate them all and don't make any changes unless you have customized Subtypes. To do this, open Enrichment Manager in UCMDB and activate all enrichment rules in the SMAX folder as below screenshot, this may take hours based on the customer’s data volume.
|
||
|
||
|
||
|
||
## Scenario 2 - On-premises UCMDB customer migrates to SaaS CMS
|
||
|
||
### Step 1: Provison a CMS customer via X4X
|
||
|
||
Auto creates a new CMS customer with the same tenantID as the SMAX tenant via X4X, including:
|
||
|
||
- Create a customer via JMX
|
||
- Bind customer to IdM Org and create an admin group with SuperAdmin\[CMDB\] role, and bind tenant admin user to this group
|
||
- Allocate license
|
||
|
||
### Step 2: Migrate On-prem UCMDB data to SaaS CMS (TS team)
|
||
|
||
- Remove the CMS customer-provisioned in step one and keep the other settings.
|
||
- TS team will use DB move script to help the customer do the data migration from On-prem UMCBD to SaaS CMS, including:
|
||
- pg\_restore the database into the intermediate Database
|
||
- Export a pgb file from the intermediate database
|
||
- import the pgb file into the target database
|
||
- Disable aging
|
||
- Set On-Prem UCMDB consumer tenant as "All Tenants", set owner tenant as "All Tenants" via script
|
||
- Create a new CMS customer with the same ID as the SMAX tenant
|
||
- Restart the customer
|
||
- Apply content pack:
|
||
- Run rebuildModelDBSchemaAndViews JMX call and then Upgrade CP
|
||
- Align the history:
|
||
- Run alignHistoryForType JMX call
|
||
|
||
### Step 3: Map the CMS Consumer customer to the IdM organization
|
||
|
||
To define the mapping between the CMS Consumer customer and the IdM organization, follow these steps as **suite-admin**:
|
||
|
||
1. Log in to the JMX Console of the CMS Provider customer: **https://<EXTERNAL\_ACCESS\_HOST>:<PORT>/jmx-console**
|
||
2. Search for the **assignIDMInfo** JMX method in the **UCMDB:service=Customer and States Services** category.
|
||
3. Provide values for the following parameters:
|
||
View Fullscreen
|
||
| Parameter | Required | Description | Example |
|
||
| --- | --- | --- | --- |
|
||
| customerID | Yes | Enter the CMS Consumer customer ID that you created in "Step 2: Create a CMS Consumer customer". This should be the same as the SMAX tenant ID created in step 1. | 654596672 |
|
||
| tenantName | Yes | Enter the IdM organization ID. This is the same as the SMAX tenant ID created in step 1. This will then map the CMS customer ID to the IdM organization. | 654596672 |
|
||
| defaultGroup | No | This sets the Default UCMDB group used by IdM users. Users in that group will inherit all the roles assigned to that default group. Make sure the default group is assigned with proper permissions for accessing CMS UI and if relevant the UCMDB Admin UI. | |
|
||
4. Click **Invoke**.
|
||
|
||
After you invoke the **assignIDMInfo** operation in JMX, the system automatically triggers a process to seed the CMS OOTB roles to the mapped IdM organization.
|
||
|
||
To check the seeding status, follow these steps as **suite-admin**:
|
||
|
||
1. Log in to the JMX Console of the CMS Provider customer: **https://<EXTERNAL\_ACCESS\_HOST>:<PORT>/jmx-console**
|
||
2. Search for the **showAllCustomers** JMX method in the **UCMDB:service=Customer and States Services** category.
|
||
3. Make sure that the value of column **Seeding role status** is **SUCCESS**.
|
||
|
||
### Step 4: Assign the CMS license (SaaS Ops team)
|
||
|
||
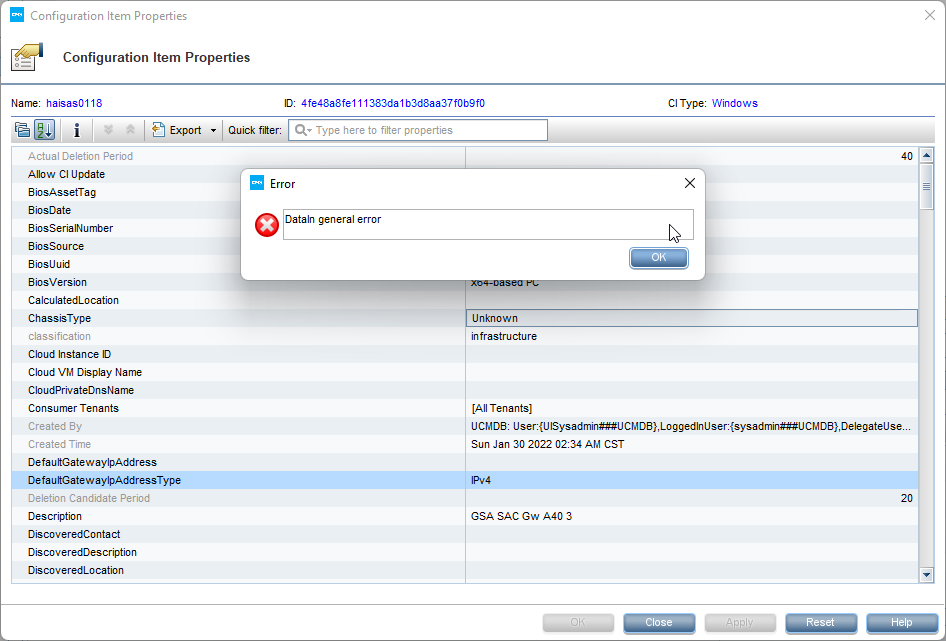
1. Sanity check CMS Customer
|
||
2. In case the CI update fails with the following error, run the jmx call alignHistoryForType for this customer
|
||
|
||
|
||
|
||
### Step 5: Set specific Identification rules as 'No Identification'
|
||
|
||
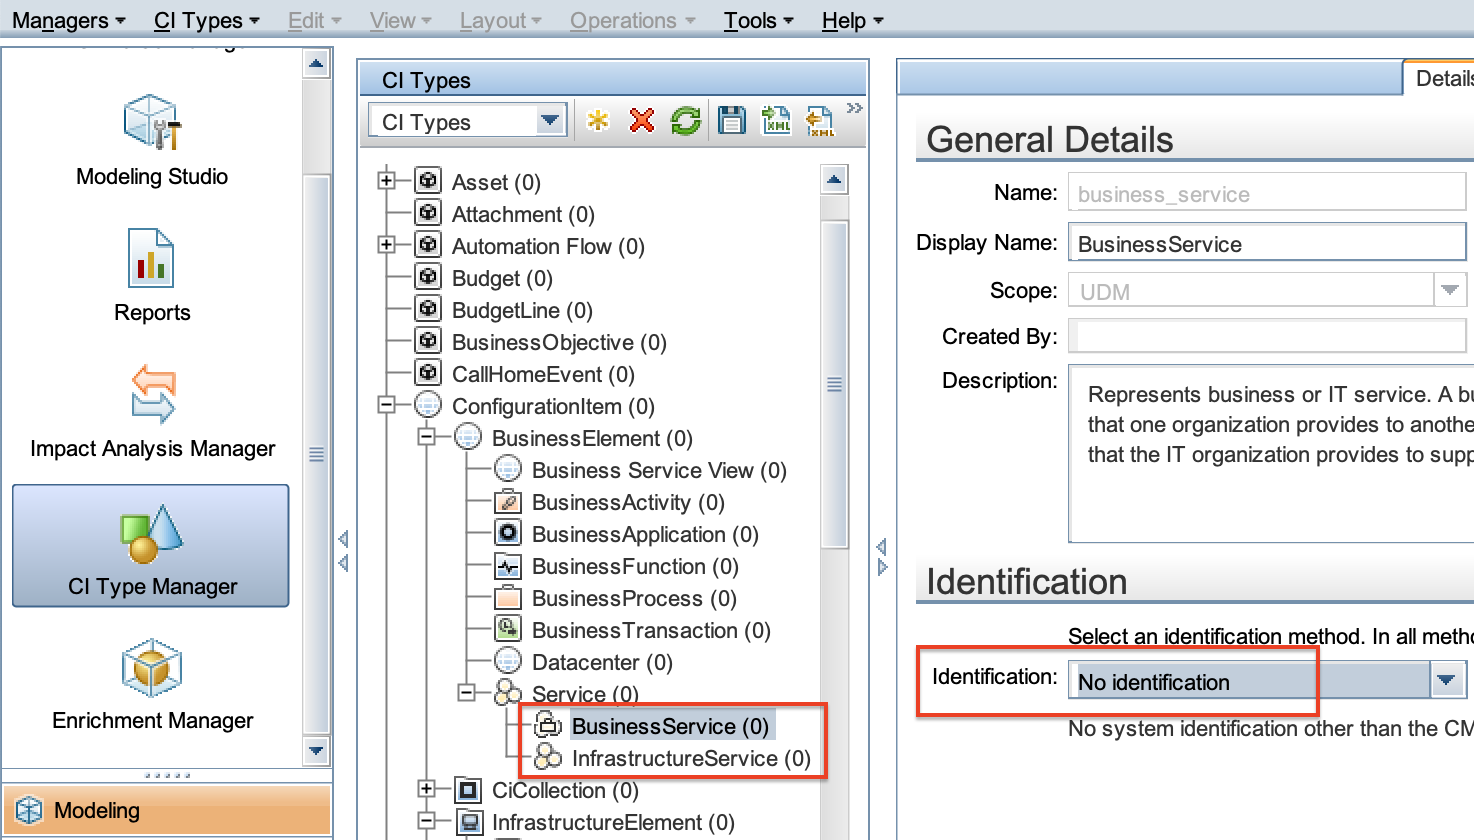
Log in to UCMDB Admin UI via the Local client of the **new created CMS customer**, locate to **BusinessApplication**, **BusinessService,** and **InfrastructureService,** and set the **Identification** as ‘ **No Identification’** for all of them, like the below screenshot:
|
||
|
||
|
||
|
||
### Step 6: Extra configuration for Native SACM enablement
|
||
|
||
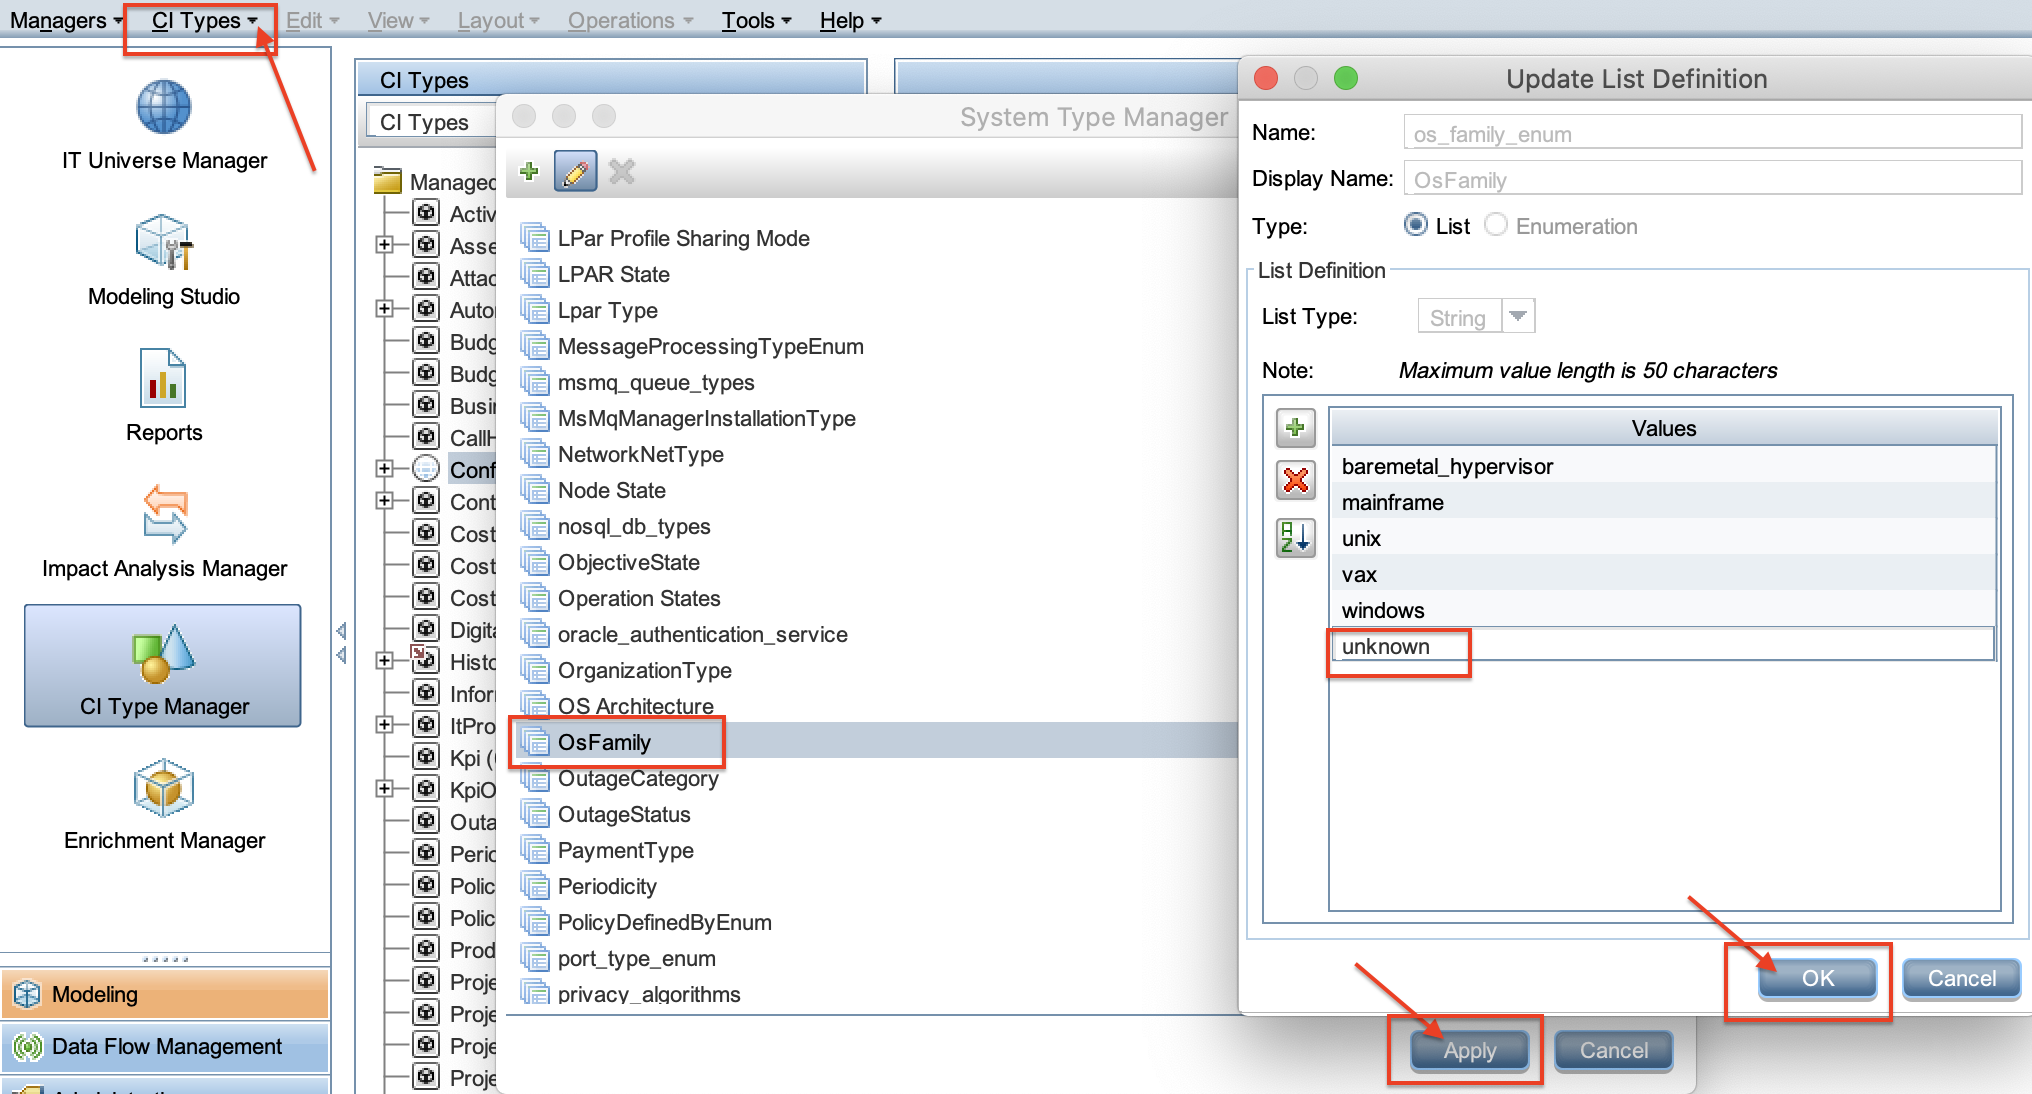
1. **Add unknown in OsFamily**
|
||
Log in to UCMDB Admin UI via the Local client of the **newly created CMS customer**, click **CI Types** at the top, select **System Type Manager**, search **OsFamily** and edit, add unknown then click **OK** and **Apply**.
|
||
|
||
|
||
### Step 7: Enable Native SACM
|
||
|
||
See details: [Enable Native SACM](https://staging.docs.microfocus.com/itom/ESM:Main/NativeSacmSaas).
|
||
|
||
### Step 8: Populate the metaphase name (no need after 23.4)
|
||
|
||
**TODO, add more details**
|
||
|
||
**sap/rest-client**
|
||
|
||
**PUT../rest/531307643/cmsx/metaphaseName/reUpgrade**
|
||
|
||
2\. due to **OCTCR19U1736320,** needs to clean up the license management [CleanUpLicenseTag](https://staging.docs.microfocus.com/itom/ESMSaaSOps:Main/CleanUpLicenseTag) once the metaphase name population is done
|
||
|
||
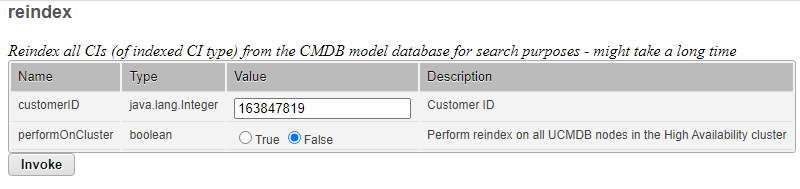
3\. after the metaphase name is populated, need to run the full reindex of Solr to prevent potential OutOfMemory issue caused by incremental index:
|
||
|
||
|
||
|
||
### Step 9: Configure Remote CMS
|
||
|
||
See details: [Config Remote CMS](https://docs.microfocus.com/doc/SMAX/24.3/SsoUcmdb).
|
||
|
||
### Step 10: Enable enrichment rules in UCMDB (Communicate with the customer) (no need after 23.4)
|
||
|
||
When a CI of a federated CI type is created or discovered in UCMDB, enrichment rules are implemented for mapping Subtypes of SMA. The SMAX folder contains preset enrichment rules for the federated CI types. By default, these enrichment rules are inactive, we recommend that you activate them all and don't make any changes unless you have customized Subtypes. To do this, open Enrichment Manager in UCMDB and activate all enrichment rules in the SMAX folder as below screenshot, this may spend hours based on the customer’s data volume.
|
||
|
||

|
||
|
||
### Step 11: Enable enhanced CI lifecycle (Optional)
|
||
|
||
It's recommended to enable the enhanced CI lifecycle.
|
||
|
||
If the customer has the aging enabled on-prem, perform the following steps; if the customer doesn't have the aging enabled on-prem and does not agree to use the enhanced CI lifecycle solution, skip this step; if the customer doesn't have the aging enabled on-prem, and they agree to use the enhanced CI lifecycle solution, perform the following steps
|
||
|
||
1. #### Enable the setting of enhanced CI lifecycle in CMS
|
||
See details: [Enable enhanced CI lifecycle in CMS UI](https://staging.docs.microfocus.com/itom/ESM:Main/CILifecycleAging#Enable_enhanced_CI_lifecycle_in_CMS_UI).
|
||
2. #### Configure metaphase for node elements in UCMDB
|
||
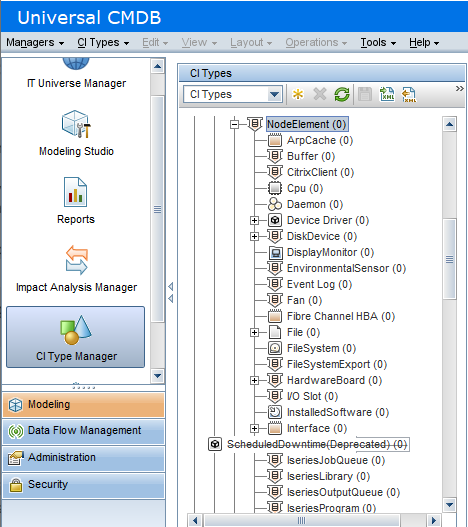
This is an additional step for the following NodeElement CI types in UCMDB: **Cpu**, **DiskDevice**, **FileSystem**, and **Interface**.
|
||
These NodeElement CI types correspond to CI attributes in SMAX. You need to manually configure metaphase for them so that they are included in the enhanced CI aging solution.
|
||
|
||
To enable aging for a NodeElement CI type:
|
||
1. Log in to the UCMDB Server.
|
||
2. Go to **CI Type Manager** > **CI Type**, and select a node element CI type.
|
||
3. Go to **Attributes**, select **Meta Phase** and thenclick the Edit icon.
|
||
4. Select **Enable default value**, enter **Inherited from the parent node** or any other non-empty value in the **Default value** field and then click **OK**.
|
||
|
||
Now, all newly created/detected NodeElement CIs will have a default value for metaphase. Then, you need to run enrichment rules to make sure all existing NodeElement CIs have a metaphase value. To do this, follow these steps:
|
||
|
||
1. Log in to the UCMDB Server.
|
||
2. Go to **CI Type Manager** > **CI Type**, and then select **ConfigurationItem**.
|
||
3. Click the **Attributes** tab, select **Meta Phase**, then click **Edit**.
|
||
4. On the **Advanced** tab, check the **Editable** checkbox, then click **OK**.
|
||
5. Go to **Enrichment Manager** and create a new rule under the **SMAX** node.
|
||
6. In the **New Enrichment Rule** wizard, name the new rule and click **Next** till the end.
|
||
7. From the **CI Type Selector** on the right, find **ConfigurationItem** > **InfrastructureElement** > **NodeElement** > **CPU** and drag it to the main window in the center.
|
||
8. In **Query Mode**, double-click the CPU icon.
|
||
9. On the **Attributes** tab, create a new condition and click **OK**:
|
||
- **Attribute Name** = **Meta Phase - (string)**
|
||
- **Operator** = **Is null**
|
||
10. In **Enrichment Mode**, double-click the CPU icon.
|
||
11. Select **Meta Phase**, then enter **Inherited from the parent node** in the **Value** box. Click **OK**.
|
||
12. Right-click the rule you just created, then click **Activate Rule**.
|
||
13. Now, the rule for **CPU** is running. Repeat the same steps for **DiskDevice**, **FileSystem**, and **Interface**.
|
||
14. Wait till there are no node elements with the null meta phase. You can make sure of this using a query in **IT Universe Manager**.
|
||
15. Right-click each rule and click **Deactivate Rule**.
|
||
16. Remove all these four rules
|
||
|
||
### Step 12: Validate CIs are consistent between SMAX and CMS
|
||
|
||
There is a Jenkins job for this purpose
|
||
|
||
### Step 13: Customer actions
|
||
|
||
1. SMAX post-upgrade actions
|
||
2. Reconfigure Probes and credentials
|
||
3. [Enable aging in CMS](https://staging.docs.microfocus.com/itom/ESMSaaSOps:Main/CmsAging#Enable_agingging#Enable_aging).
|