57 lines
3.2 KiB
Markdown
57 lines
3.2 KiB
Markdown
# Configure-custom-SMTP-for-UCMDB_688983358
|
||
## Introduction
|
||
|
||
## Step 1. Get AWS SMTP server host
|
||
|
||
The smtp server host is dedicated for each region of AWS. Please refer to SMTP Endpoints of [Amazon Simple Email Service endpoints and quotas](https://docs.aws.amazon.com/general/latest/gr/ses.html) for details.
|
||
|
||
## Step 2. Create email credentials for the UCMDB - Optional
|
||
|
||
This step to create a custom sender SES identity is OPTIONAL. This is only needed if the customer requires a "custom sender" email address.
|
||
|
||
You can use the Farm AWS SES identity details instead. This is actually the preferred method.
|
||
|
||
Note: for the below steps you need to login to AWS Console using the ESM user, or ask someone from PSEC (MFI-Product Security Operations <MFI-ProductSecOps@ [opentext.com](http://opentext.com/) >) to create this IAM user.
|
||
|
||
1. Open the **“Amazon Simple Email Service”** on the AWS console
|
||
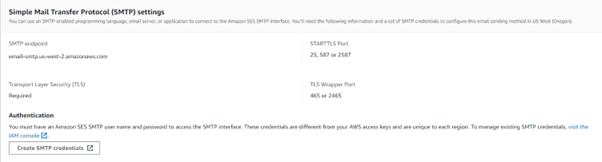
2. Go to select the **“SMTP Settings”** on left pane, click **“Create SMTP credentials”** in the **“Simple Mail Transfer Protocol (SMTP) settings”**
|
||
|
||
|
||
|
||
1. Give the new IAM user name as **“ses-smtp-user.{farm alias}-{tenantId}”**, for example:
|
||
|
||

|
||
|
||
1. Click **Create**.
|
||
2. **Due to a limitation in UCMDB,the SMTP User password doesn't support special character like(/ \* -),so you have to repeat the IAM user creation until you got a Secret Key contains only alphabetic character.**
|
||
3. Save the access key, username, and access secret key into parameter store. The parameter path format:
|
||
- /{farm}/tenant/{tenantId}/iam/ses/key: Access key
|
||
- /{farm}/tenant/{tenantId}/iam/ses/name: Username
|
||
- /{farm}/tenant/{tenantId}/iam/ses/secret: Access Secret Key
|
||
|
||
## Step 3. Verify customer’s email address in AWS SES identity
|
||
|
||
Refer to [Configure custom mail sender, dedicated AWS SES users](https://rndwiki.houston.softwaregrp.net/confluence/display/ICS/Configure+custom+mail+sender%2C+dedicated+AWS+SES+users) to verify customer’s email address in AWS SES identity
|
||
|
||
## Step 4. Configure SMTP via JMX
|
||
|
||
1. Log into JMX Console and for **setSettingValue** 
|
||
2. Search JMX method **listResourceTypes**, input tenantid and click invoke.
|
||
Click **Settings\_STATE\_CUSTOMER\_SETTING**
|
||
Click **email.send.from
|
||
**Manually input the email sender in <value> if the value is not correct,click 'save resource'.
|
||
You may see a value like: <value>sma\_noreply&#x40;[microfocus.com](http://microfocus.com/) </value> with hex code for the "@" character. Change it to the visible "@" character on your keyboard.**
|
||
|
||

|
||
|
||
**
|
||
3. Search JMX method **showSettingsByCategory**, input customerID, **Mail Settings** as category and click invoke. Review all the values you input.
|
||

|
||
4. example
|
||
|
||
## Step 5. Test to send report
|
||
|
||
1. log into CMS UI https://cms.<farm-alias>-smax.saas.microfocus.com/ucmdb-browser/ui/reports?customerID=123456789
|
||
2. Go to 
|
||
3. 
|